Troubleshooting
Before Installing
Linux OS not listing serial port?
If you get the following error when trying to flash your device: Failed to find device via USB. Is it connected and powered on?
Make sure your device is being detected and serial ports are being mounted by running:
ls /dev/ttyUSB*
/dev/ttyUSB0, and two ports for Maix Amigo /dev/ttyUSB0 /dev/ttyUSB1.
If you don't see them, your OS may not be loading the correct drivers to create the serial ports to connect to. Ubuntu has a known bug where the brltty driver "kidnaps" serial devices. You can solve this problem by removing it:
sudo apt-get remove brltty
Device not charging or being recognized?
If you have a Maix Amigo, make sure you're using the USB-C port at the bottom of the device, not the one on the left side.
Different computer hosts have varying hardware, operating systems, and behaviors regarding connecting to their USB ports. Below are the expected behaviors:
USB-A:
Your device should charge and turn on when connected to a USB-A port, even if it was initially turned off. You can also turn off the device while it continues to charge. However, some hosts' USB-A ports may behave like USB-C ports, as described below.
USB-C:
M5StickV, WonderMV
The USB-C ports on the M5StickV and WonderMV lack the pull-up resistors required for host (computer) recognition and power. If you don't have a USB-A port available, you can use a USB hub between your computer's USB-C port and these devices.
Maix Amigo, Cube
-
If the device is turned off and connected to a USB-C port, it should turn on and start charging. You can turn it off again, and it will continue to charge.
-
If the device is already turned on and connected to a USB-C port, it may not charge or be recognized by the computer. In this case, turn off the device to initiate recognition and charging. Once turned off and reconnected, the device should restart, be recognized by the computer, and charging should be triggered by USB-C hosts. If your device is not charging or being recognized as expected, try using a different USB port or a different computer to determine if the issue is with the device or the host's USB port.
Device randomly freezes or restarts?
If the device behaves this way when connected to the computer, Windows is known to have issues with USB-C devices. If you are experiencing random crashes or even reboots and your device does not have a battery, try using a phone charger or other power source such as a power bank.
Error when flashing
If flashing fails with an error: Greeting fail, check serial port (SLIP receive timeout (wait frame start)) or [ERROR] No vaild COM Port found in Auto Detect, Check Your Connection or Specify One by --port/-p, double check the command used. Most of devices need to pass the argument -B goE to ktool, but dock and wonder_mv uses the argument -B dan instead. For yahboom you also need to manually specify the port using the -p argument.
WonderMV: Some units have a hardware issue that can leave the device in a bad state in which it can't be flashed . If flashing fails, unplug the USB cable, wait 10+ seconds to allow the hardware to fully reset, then reconnect and retry.
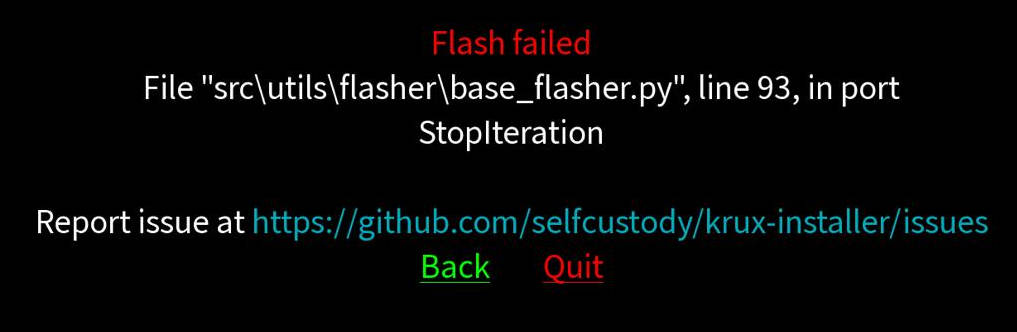
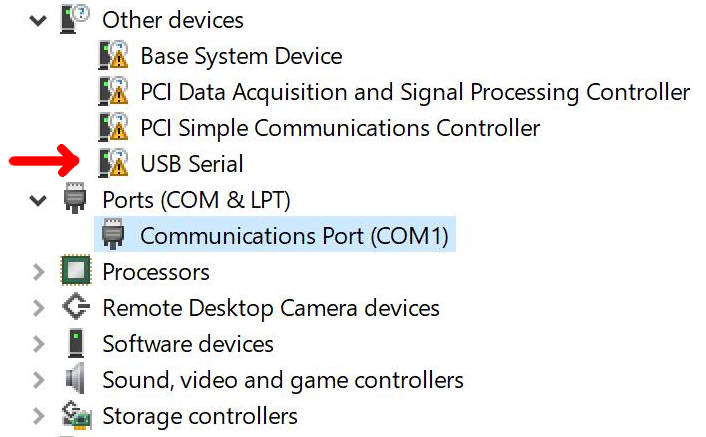
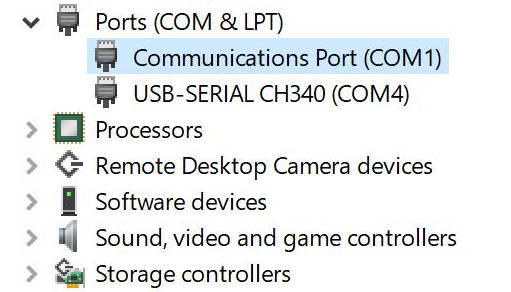
On Windows, you may encounter the flash failed error when trying to flash Yahboom or WonderMV using Krux-Installer. This means that Windows could not find the driver to communicate with the device via USB (an unrecognized USB Serial will be listed in Device Manager -> Other devices). To fix this, download and install the CH340/341 driver (a USB-SERIAL CH340 will be listed in Device Manager -> Ports (COM & LPT)).
On macOS, you may also run into flashing errors. This often happens when a proper CH34X USB driver is missing, preventing proper communication with the device. To fix it, install the CH341 driver. In a terminal, type:
brew install --cask wch-ch34x-usb-serial-driver
After Installing
Maix Amigo touchscreen doesn't work with v24.03.0 and later, but worked okay with v23.09.1?

We added a hardware IRQ (interrupt request) to the firmware, so when you open your Maix Amigo, you will see a switch in the middle of the device board, it must be in the upper position for the touchscreen to work with v24.03.0 and later.
Troubleshooting LCD Settings on Maix Amigo
Buttons in the Wrong Order
If the buttons on keypad input screens appear to be in the wrong order, this might be due to inverted X coordinates. To correct this:
- Go to Settings -> Hardware -> Display.
- Change the value of
Flipped X Coordinates.
Incorrect Colors
If the colors displayed on the interface themes or camera feed are incorrect, you can try the following options:
-
Inverted Colors: If, for example, the background color is white when it should be black, go to Settings -> Hardware -> Display and toggle
Inverted Colors. -
BGR Colors: If, for example, you are using the Orange theme, and instead of orange the colors appear bluish, Settings -> Hardware -> Display and toggle
BGR Colorsin the display settings. -
LCD Type: WARNING! Only try changing this setting if you failed to fix colors with previous ones.
-
If adjusting
Inverted ColorsorBGR Colorsdoesn't fix the incorrect color issue, try changing theLCD Type:- (1) After changing
LCD Type, you will be warned that the device will reboot automatically if this change does't resolve the issue. - (2) After that, if you see a message prompting you to press the
PREVIOUS(UP) button, it means that the new setting worked, if you see a black screen only, it means it failed. - (3) If it works but the colors are still wrong, try again with different combinations of
Inverted ColorsandBGR Colors. This time, you'll likely find a combination that correctly displays the colors of your interface themes and camera feed.
If, after the step (1), the screen turns black and you don't see anything, don't panic, don't press any button, just wait 5 seconds. After 5 seconds the device will automatically reboot with the previous
LCD Typesetting meaning you should not change this setting and maybe try again withInverted ColorsandBGR Colorsonly.If you pressed
PREVIOUS(UP) and Krux saved the wrongLCD Typesetting, you will have to remove all stored settings to see the screen working again. If settings were on SD, remove it from the device and edit or delete the settings manually. If settings were on device's internal memory you will have to wipe it's entire flash memory. You can use the Krux-Installer -> Wipe device feature or type a command on terminal with the device connected. On Linux for example, go to the folder where you downloaded the Krux firmware and use Ktool to fully wipe your device (on other OS usektool-win.exeorktool-mac):./ktool-linux -B goE -b 1500000 -EThen flash the firmware again using Krux-Installer or by typing on the terminal:
./ktool-linux -B goE -b 1500000 maixpy_amigo/kboot.kfpkg - (1) After changing
-
Device does not reboot, screen is blank or stuck on logo
If the device didn't reboot after successfully flashing the firmware, or the screen is blank after turning it off and on, or if the device is frozen with the logo on the screen, check if the downloaded file matches your device or try downloading the binaries again, as this could also be due to data corruption.
You can also install MaixPy IDE to help with debugging. On its menu go to Tools -> Open Terminal -> New Terminal -> Connect to serial port -> Select a COM port available (if it doesn't work, try another COM port). It will show the terminal and some messages, a message about an empty device or with corrupted firmware appears like: "interesting, something's wrong, boot failed with exit code 233, go to find your vendor."
Usage
Why isn't Krux scanning the QR code?
The screen displays exactly what Krux sees through its camera. If the QR code looks blurry, the lens may be out of focus. You can correct this by gently rotating the lens: turn it counterclockwise (unscrewing to reduce focus distance) or clockwise (screwing to increase focus distance) until the image sharpens. Be aware that the factory may have secured the lens with a small drop of glue, making the first adjustment a bit harder. To rotate the plastic lens ring, use your fingertip, tweezers, or small precision pliers (ideally wrapped with electrical tape to prevent scratches). Once adjusted, future focusing should be much easier.
If the lens is already adjusted, the problem may be the distance to the QR code. Hold the device close to the code, then slowly pull it back until the full QR code fits on the screen. Once the code appears sharp and clear, Krux should detect it quickly and respond immediately.
Tip: You can hold down the ENTER button of the M5StickV, Maix Amigo or WonderMV to turn on their LED light to potentially increase visibility. All cameras have zoom and anti-glare mode, use anti-glare to capture images from high brightness screens or with incident light. Enable/disable zoom/anti-glare by pressing PAGE button while scanning.
Error when scanning QR code?
If Krux is recognizing that it sees a QR code but is displaying an error message after reading it, the likely reason is that the QR code is not in a format that Krux works with. We have listed the supported formats below:
For BIP39 mnemonics:
- BIP39 Plaintext (Used by Krux and https://iancoleman.io/bip39/)
- SeedSigner SeedQR and CompactSeedQR Formats
- UR Type
crypto-bip39 - Encrypted QR Code (Format created by Krux, more information here)
For Wallet output descriptor:
- JSON with at least a
descriptorkey containing an output descriptor string - Key-value INI files with at least
Format,Policy, andDerivationkeys - UR Type
crypto-output
For PSBT (Partially Signed Bitcoin Transactions):
- Base43, Base58, and Base64-encoded bytes
- Raw Bytes
- UR Type
crypto-psbt
Additionally, Krux recognizes animated QR codes that use either the plaintext pMofN (the Specter QR format) or binary UR encodings.
Computer not reading QR code that Krux displays?
You can toggle brightness of PSBTs QR codes by pressing PAGE or PREVIOUS button. If you are using an M5StickV, the small screen makes it difficult for laptop webcams to capture enough detail to parse the QR codes it displays. For now, a workaround you can do is to take a picture or video of the QR code with a better-quality camera (such as your phone), then enlarge and display the photo or video to your webcam.
Alternatively, it may be simpler to use a mobile wallet (BlueWallet or Nunchuk) with the M5StickV since phone cameras don't seem to have issues reading the small QR codes. You can also save the PSBT on a microSD card for Krux to sign and then save the signed PSBT to transfer the file to the computer or phone. Other QR codes displayed by Krux can also be exported as an image to the SD card.
Why Does Krux Say the Entropy of My Fifty Dice Rolls Does Not Contain 128 Bits of Entropy?
Please check how entropy measurement works.
Why isn't Krux detecting my microSD card or presenting an error?
Starting from version 23.09.0, Krux supports SD card hot plugging. If you’re using an older version, the SD card may only be detected at boot - so make sure to power off Krux before inserting the microSD card.
To check card compatibility, go to Tools -> Device Tests -> Check SD Card. Version 25.10.0 further improved SD card compatibility, so updating may resolve detection issues.
Note: Make sure the SD card is using MBR/DOS partition table and FAT32 format, in this video Crypto Guide explains how to do this in Windows. If it is still not detected, try deleting all large files in it.
Why does my WonderMV reboot when I insert an SD card?
It seems WonderMV has a hardware design issue: It lacks a decoupling capacitor in the circuitry that powers the SD card. Some SD cards may cause the supply voltage to drop when inserted, triggering a reboot.
Workarounds:
- Insert your SD card before turning on the device, for example, when signing PSBTs, insert the SD card containing the unsigned PSBT before powering WonderMV on and loading your key.
- Try different SD cards, as some require less current and won't cause the device to reboot.